Pickups
Instead of dropping packages off, you can ask FedEx, UPS, USPS, or DHL to send a driver to collect them. Parcelcraft checks the carrier’s real availability and shows any pickup fee before you commit.
You can open the pickup flow from several places:
- Click Pickups at the top of the full-page app, or in the drawer’s footer menu.
- After buying a label in the drawer, click Request driver pickup on the print label view.
- In Shipment history, open a shipment and click Request pickup — available until the carrier collects the package.
The Pickups view has two tabs: Request a pickup, where you schedule a new pickup, and Pickups, which lists pickups you’ve already requested.
Step 1: Select shipments
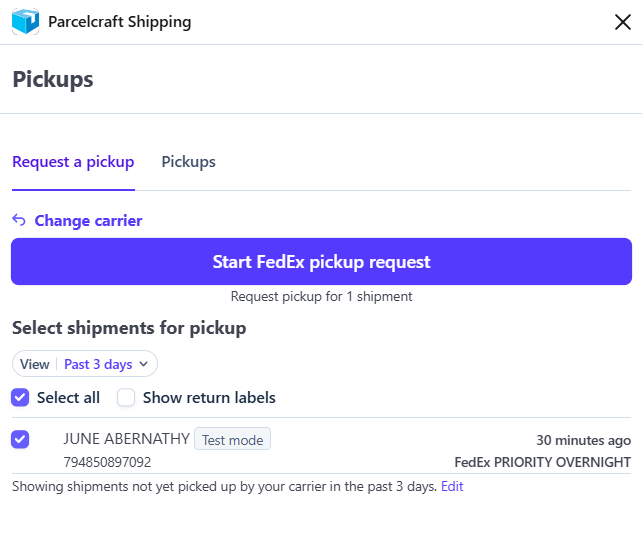
Parcelcraft lists your shipments that the carrier hasn’t collected yet — from the past 3 days by default. Use the View chip to widen the search window (from today only up to the past 30 days), and check Show return labels to schedule a pickup for your return shipments instead.
A pickup belongs to a single carrier. If your uncollected shipments span more than one carrier, pick the carrier first — Change carrier switches between them — and request a separate pickup for each carrier.
Check the shipments you want collected (or Select all) and click Start [carrier] pickup request — for example, Start FedEx pickup request.
Step 2: Schedule the pickup
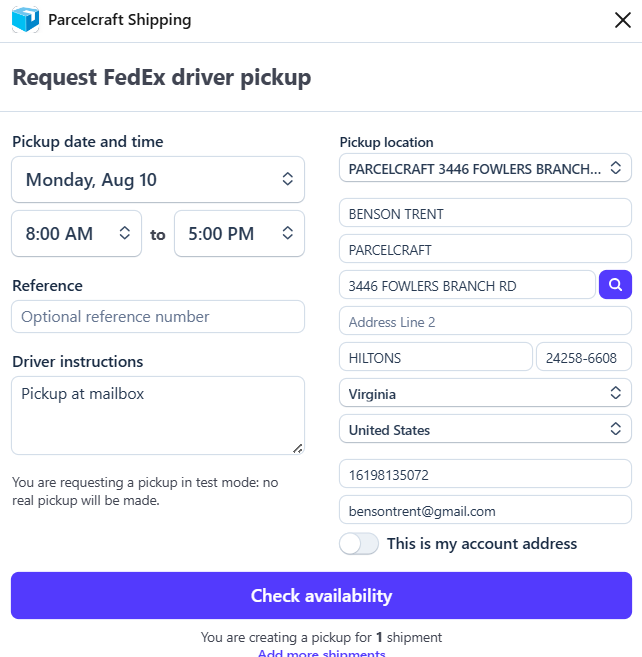
Tell the carrier when and where to come:
- Pickup date and time — choose a date (up to ten days out; Sundays are excluded) and a time window between 8:00 AM and 5:00 PM.
- Reference — an optional reference number for your own records.
- Driver instructions — gate codes, “pick up at porch”, and similar. Parcelcraft remembers your instructions and time window for the next pickup.
- Pickup location — pick one of your saved origin addresses, or edit the address fields to use somewhere else. For a single-shipment pickup you can also choose the shipment’s own address.
The caption at the bottom confirms how many shipments the pickup covers, and Add more shipments returns you to the selection step.
When everything looks right, click Check availability to send the request to the carrier.
In Stripe test mode the flow works end to end, but no real pickup is made.
Step 3: Confirm and buy
If the carrier can make the pickup, you’ll see Confirm pickup request with the price — for example, Pickup cost: $4.50 USD — and a Buy Pickup button. Review the pickup details below, and use Edit pickup request if anything needs to change.
If the pickup isn’t available, the carrier’s messages are shown instead — click Edit pickup request and try a different date or time window.
After you buy, you’ll see Pickup confirmed and land on the Pickups tab.
Manage scheduled pickups
The Pickups tab lists your recent pickups with a Scheduled or Canceled badge, and Show details reveals the confirmation number, cost, pickup window, location, and driver instructions. Canceled and past pickups are hidden by default — open the View filter to show them.
Click Cancel pickup to call off an upcoming pickup. Pickups can’t be edited after purchase — to change one, cancel it and schedule a new pickup.
Shipping with USPS or DHL and your driver already comes by? An end-of-day scan form lets them accept the whole day’s shipments with a single scan — no pickup request needed.