Bulk shipping
Bulk shipping lets you quote, buy, and print many shipping labels in one flow. Select the orders in the Orders list, and Parcelcraft prepares a shipment for every one of them — prefilled from each order and your defaults — so your job is just to confirm, quote, and buy. It’s the full-page counterpart to 1-click shipping for high-volume days.
Bulk shipping also works in the drawer: select orders in the drawer’s unshipped list and the same batch view opens there.
Select orders and start the batch
- In the Create shipment tab, select orders using the checkboxes. You can move between pages of the list — your selection is remembered.
- In the Bulk actions bar that appears above the list, click Create shipments (the button shows how many you’ve selected, for example Create 12 shipments).
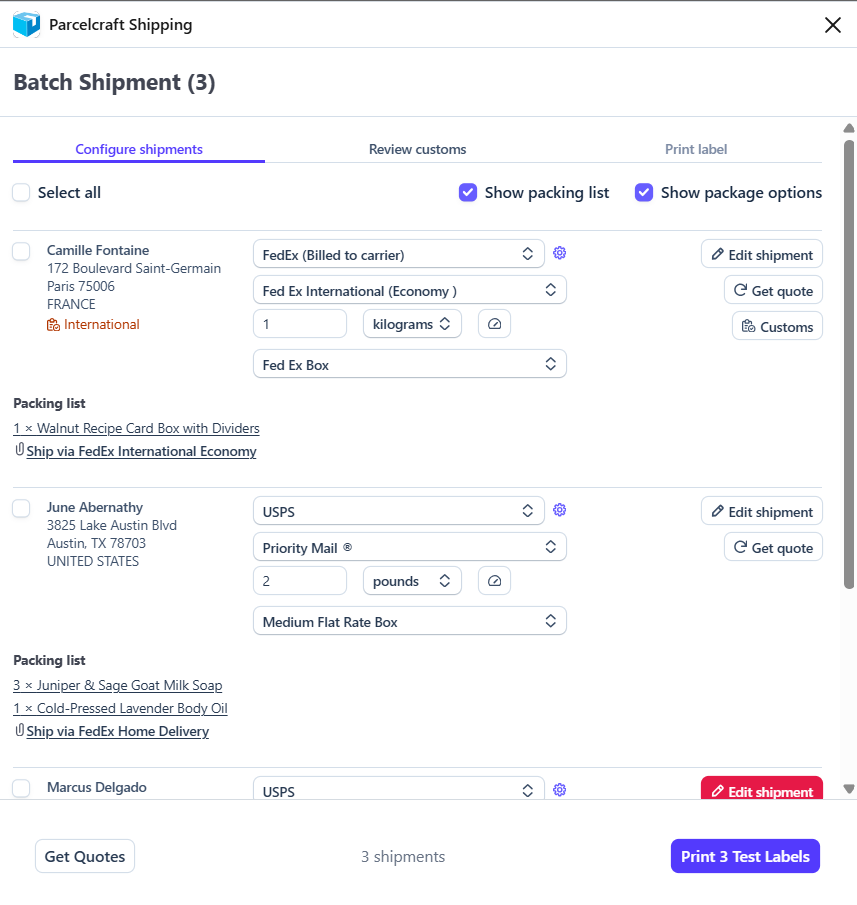
The Batch Shipment view opens with one row per order.
Configure the shipments
Each row is a complete shipment, prefilled the same way a single shipment is: the recipient from the payment or invoice, your default carrier and service, the package and weight from the order items and your settings, and an International badge when the destination needs customs. You rarely need to touch a row, but when you do:
- Edit inline. Every row has its own carrier and service selector and a compact weight and packaging editor, so most fixes never leave the list.
- Edit shipment opens the full editor for that order — the same configure view as a single shipment — when you need address changes or more options.
- Fix what’s flagged. A row with a problem shows a Needs attention chip; hover it to see what’s wrong (missing weight, no service selected, over a carrier limit) and click Fix to jump to it.
One Ship from address applies to every shipment in the batch — pick it at the top of the list if you have more than one origin address. The Show packing list and Show package options checkboxes compress or expand the rows, which helps with long batches.
Apply settings to many shipments at once
To change several shipments together, select their rows. A bulk actions bar appears where you can choose a carrier and service or edit the package, then click Apply to Selected to write those settings to every selected row. The same bar has Remove selected to drop orders from the batch — the batch count in the title updates to match.
Get quotes and select rates
Click Get Quotes in the footer to fetch rates for every shipment in the batch. Each row then gets its own rate dropdown, sorted cheapest first and showing the delivery estimate, price, carrier, and service:
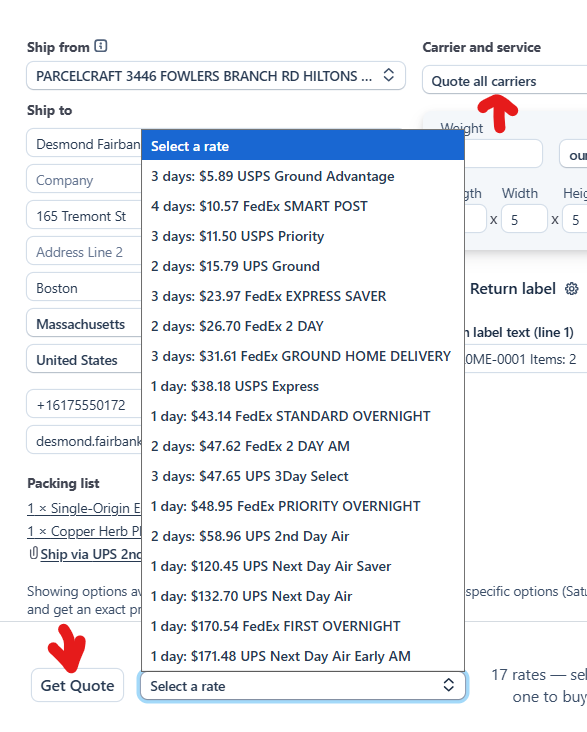
- If a row already had a carrier and service chosen, the matching rate is selected automatically — and rows configured this way can even be bought without quoting at all.
- If a quote comes back empty, the row shows No rates returned with the carrier’s reasons — adjust the carrier, package, or address and Re-quote.
- Editing a shipment after quoting invalidates its quote, just like a single shipment — the row shows Changed - requote.
The footer keeps a running summary of the whole batch: how many shipments are quoted, ready, or purchased, and the total cost of the rates you’ve selected.
Review customs
If any shipment in the batch is international, a Review customs tab appears. It lists a customs declaration for every international shipment — items are prefilled from each order’s packing list — followed by a single Declare your shipment type section (contents type, certification, and signature) that applies to all of them at once.
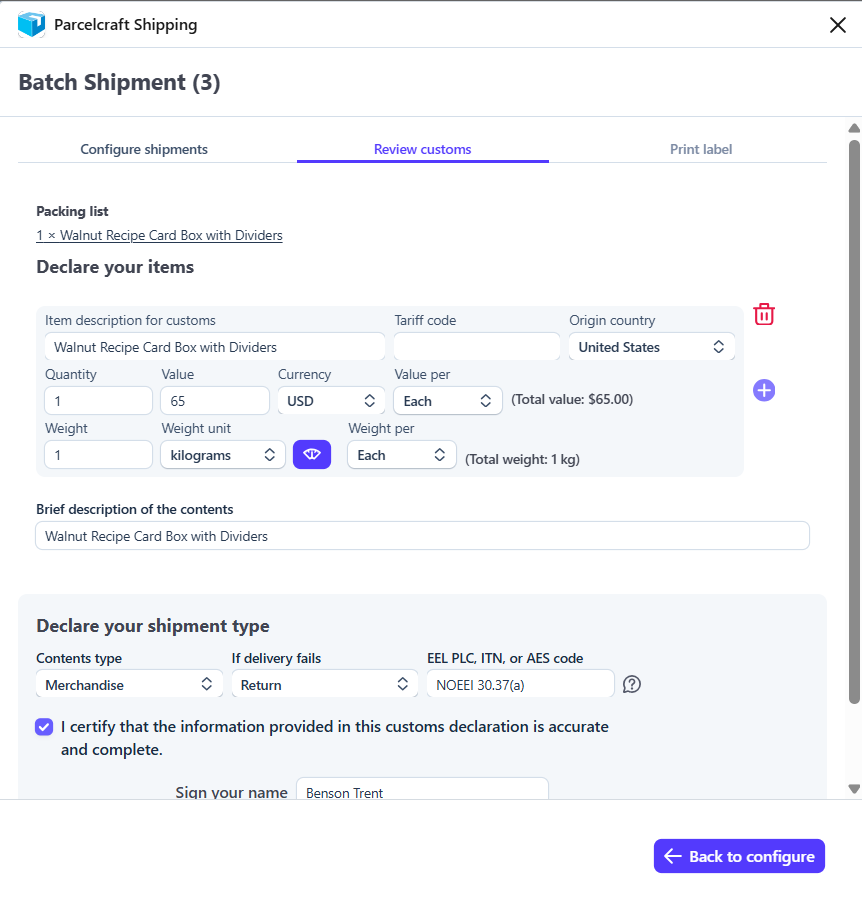
You can’t buy until customs are complete: the footer shows Review customs in place of the buy button until every international shipment has its items declared and the declaration is signed. See International shipping for the details of each field.
Buy the labels
When shipments are ready, the footer button becomes Buy Labels with the count — for example Buy 12 Labels. Click it and Parcelcraft purchases the labels, marking each row as it completes.
- In Stripe test mode, the button is Print Test Labels instead — the whole batch generates free test labels, no postage purchased.
- Failures don’t stop the batch. If a label can’t be purchased, that row shows the carrier’s error with Retry and Fix buttons, while the successful labels are ready to print. Fix the failed shipments and retry them individually — you’re never blocked from printing the labels that succeeded.
When every purchase succeeds, the view moves to the Print label tab automatically.
Print all the labels
The print view lists every purchased label with its recipient, a Packing list of the order’s items so you can pick and pack each box as you go, and a badge confirming the customer’s tracking email — for example, Tracking email sent to jenny@example.com, or No email sent (test label) for test labels:
- Print Labels in the footer opens every label as a single combined PDF in a new browser tab — one print job for the whole batch. Your label size (4 x 6” or 8.5 x 11”) and packing slip preferences from Settings apply.
- Send all to PrintNode printer appears when PrintNode is configured — and if automatic printing is on, a fully successful batch prints on its own as soon as the labels are ready. If any shipment failed, automatic printing pauses until you resolve it, and you can still send the successful labels to the printer individually.
- Add insurance to all shipments insures every label in one click, with each amount prefilled from its order total.
- Each row also has its own Print label link and per-shipment insurance field if you’d rather handle them one at a time.
Every purchased label updates the order’s ship status to Shipped, sends the customer’s tracking email, and appears in the Shipment history tab — where you can also reprint labels in bulk later: select shipments and click Print labels in its bulk actions bar.
Once the labels are on their boxes, schedule a driver pickup or hand your driver an end-of-day scan form so the whole batch is accepted with one scan.