Creating a shipment
Every shipment — single, bulk, or blank — is created in the same Create shipment view. You can open it from anywhere you see an order:
- In the Orders list, click a row or its Create shipment button.
- Click + Create shipment at the top of the full-page app to start a blank shipment that isn’t tied to a payment or invoice.
- In the drawer, the same view opens from an order in the unshipped list, or from the Parcelcraft panel on a payment, invoice, or customer page.
The view has up to three tabs, and the second and third appear only when they become relevant:
| Tab | When it appears |
|---|---|
| Configure shipment | Always |
| Review customs | The shipment is international |
| Print label | You’ve bought a label or printed a test label |
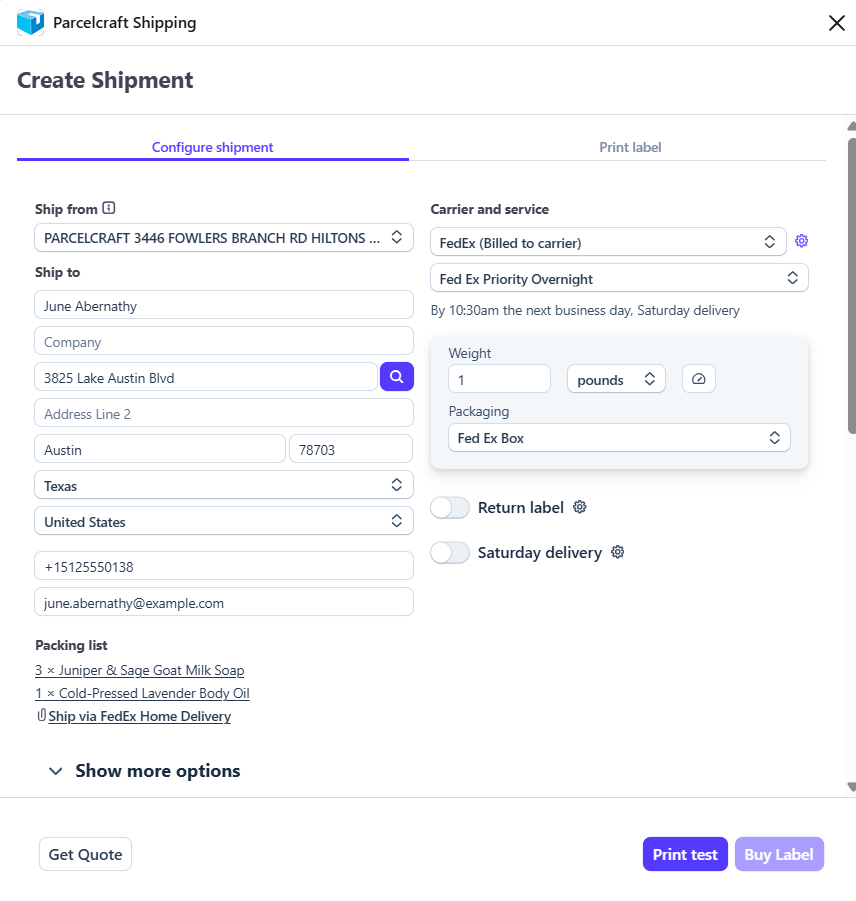
Configure the shipment
Everything is prefilled from the order and your Parcelcraft defaults, so for most shipments you only confirm what’s already there:
- Ship from — your default origin address is preselected; use the dropdown to switch between your saved origin addresses. Add or edit origin addresses on the Parcelcraft Settings page.
- Ship to — prefilled from the payment or invoice. Click the magnifying glass next to the street address to verify the address against the carrier database and fix typos before you buy postage.
- Packing list — the items on the order, with quantities, plus the shipping option your customer chose at checkout so you can match it.
- Carrier and service — prefilled from your carrier defaults. The service list only shows services that fit the destination (domestic or international), and a delivery estimate appears under the selected service.
- Weight and packaging — enter the package weight, or click the scale button to read it from a connected digital scale. Choose a carrier predefined package (its dimensions are fixed, so no dimension fields appear) or your own packaging with custom length, width, and height.
- Return label and Saturday delivery toggles sit below the package, with more carrier options — signatures, alcohol, dry ice, third-party billing, tax IDs, and more — behind Show more options. See Shipment options for the full list, third-party billing, and how to save options as defaults.
Size and weight validation
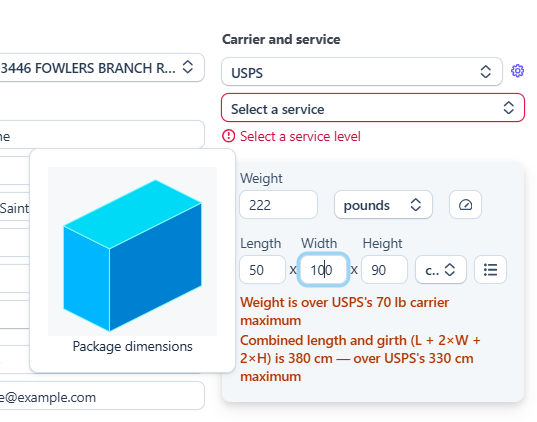
Parcelcraft checks the package against carrier limits as you type:
- Errors mean the carrier will refuse the package: the weight is over the maximum for the selected service or predefined package, or the combined length and girth (L + 2×W + 2×H) is over the service’s stated limit.
- Warnings mean you’ve exceeded the carrier’s published guidelines — USPS caps packages at 70 lb and 130” combined length and girth; UPS and FedEx at 150 lb, 108” on the longest side, and 165” combined — but the selected service doesn’t state a hard limit of its own.
Messages appear in the units you’re typing in, whether imperial or metric:
Get rates and buy the label
There are two ways to price a shipment:
- Pick a carrier and service directly. If you already know how it ships — say, FedEx Priority Overnight — select them and buy at that service’s rate.
- Compare rates. Click Get Quote to fetch rates from all of your connected carriers, sorted by price. Select the rate you want.
Print test and Buy Label stay disabled until you’ve either chosen a carrier and service or selected a quoted rate. If you edit the shipment after quoting — address, package, options — the quote is invalidated and you’ll need to re-quote, so you never buy a label at a stale rate.
Test labels: In Stripe test mode, only test labels can be purchased — Buy Label is disabled. In live mode you can still click Print test to generate a free test label before committing to postage.
For international shipments, the footer shows Review customs until the customs declaration is complete — see International shipping for details.
After you buy
Once the label is purchased, the Print label tab opens with the recipient, packing list, tracking number, and a preview of the label:
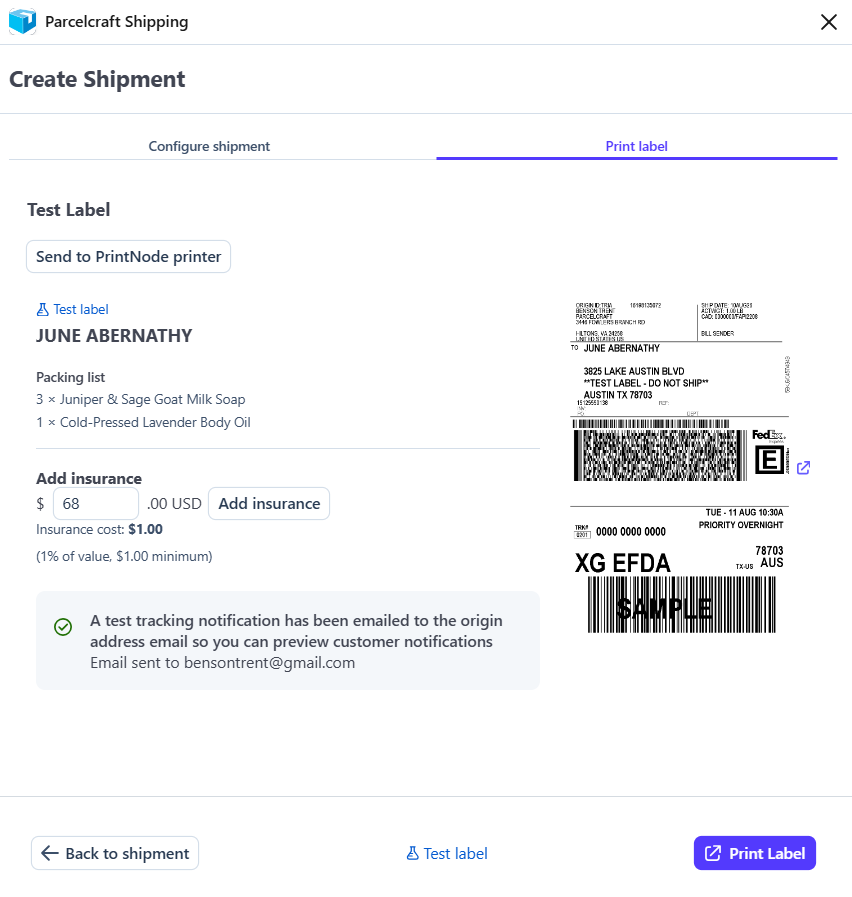
From here you can:
- Add insurance — the amount is prefilled from the order total; insurance costs 1% of the declared value with a $1.00 minimum. See Insurance.
- Send to PrintNode printer — appears when PrintNode is configured, and labels can also print automatically as soon as they’re purchased.
- Confirm the tracking email — for test labels, a preview of the customer notification is emailed to your origin address instead of the customer.
- Schedule a driver pickup so the carrier collects the package, instead of dropping it off.
Click Print Label to open the label in a new browser tab:
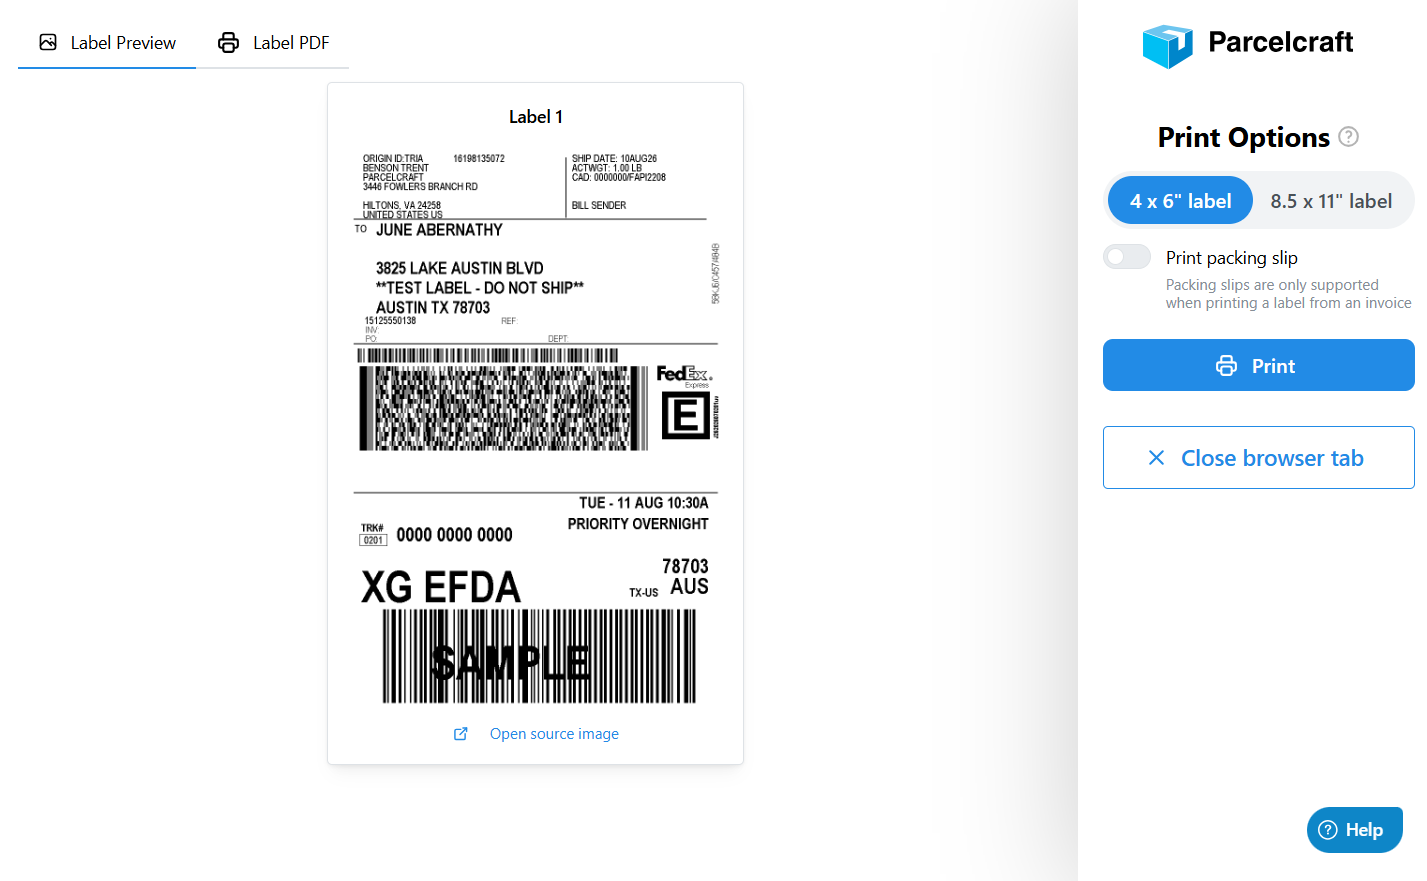
Choose 4 x 6” label for thermal label printers or 8.5 x 11” label for standard paper, toggle Print packing slip to include one (available when the label was created from an invoice), and click Print.
Printed a test label but ready for the real thing? The Print label tab offers Re-edit & buy real label, which returns you to the shipment with everything still filled in.